Mastodon

Running a Xilinx hw_server as Docker Container

This article describes the necessary steps to run a Xilinx hw_server as a Docker container.

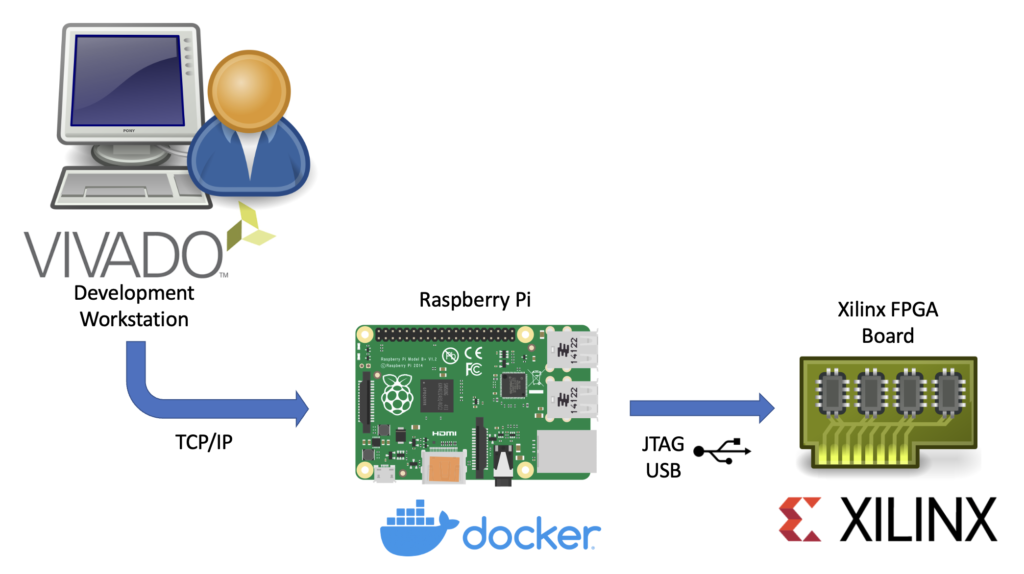
Xilinx’s hw_server is a command line utility which handles JTAG communication between a Xilinx FPGA board and usually the Vivado IDE. It can be used to configure the FPGA bitstream, connect to the embedded logic analyzer cores (ILA) or perform debugging of processor cores via GDB and the Xilinx System Debugger (XSDB). The hw_server is usually used when those tasks shall performed remotely as the connection between Vivado or XSDB is established via TCP connection and allows us to run it on a remote system.

Running the hw_server as a Docker container has the benefit that its installation is simplified to starting a Docker container by running:

docker run --restart unless-stopped --privileged --volume /dev/bus/usb:/dev/bus/usb --publish 3121:3121 --detach ghcr.io/stv0g/hw_server:v2021.2

It also allows us to run the hw_server on architectures which are not natively supported by Xilinx such as the commonly used Aarch / ARM64 and ARMv7 architectures found in Raspberry Pis.

This is enabled by Dockers support for running container images for non-native architectures. I am using the aptman/qus image to setup this user-mode emulation. qemu-user-static (qus) is a compilation of utilities, examples and references to build and execute OCI images (aka docker images) for foreign architectures using QEMU’s user-mode emulation.

Run the following commands to run the hw_server on a embedded device:

# Install docker
sudo apt-get update && sudo apt-get upgrade
curl -sSL https://get.docker.com | sh

# Start Docker
sudo systemctl enable --now docker

# Enable qemu-user emulation support for running amd64 Docker images
# *Note:* only required if your system arch is not amd64!
docker run --rm --privileged aptman/qus -s -- -p x86_64

# Run the hw_server
docker run --restart unless-stopped --privileged --volume /dev/bus/usb:/dev/bus/usb --publish 3121:3121 --detach ghcr.io/stv0g/hw_server:v2021.2

This setup has been tested with a Raspberry Pi 4 running the new 64-bit Debian Bullseye Raspberry Pi OS.

The pre-built Docker image for the hw_server of Vivado 2021.2 is available via ghcr.io/stv0g/hw_server:v2021.2.

Detailed instructions can be found in the following Git repo: https://github.com/stv0g/xilinx-hw-server-docker.

Encrypted credentials for Amazon AWS command line client

In this quick post I will show howto use the password manager „password-store1 to securely store your credentials used by the Amazon Webservices command line client.
aws_cli

The installation for Mac and Linux system is fairly easy:
$ pip install awscli

The credentials are stored as key-value pairs inside a PGP-encrypted file.
Everytime you call the AWS CLI tool, your keys will be decrypted and directly passed to the aws tool.

Use pass to add your keys in the store:
$ pass edit providers/aws

An editor opens. Use the following format:
User: stv0g
Access-Key: AKB3ASJGBS3GOMXK6KPSQ
Secret-Key: vAAABn/PMAksd235gAs/FSshhr42dg2D4EY3

Add the following snippet to your .bashrc:

function aws {
	local PASS=$(pass providers/aws)
	local AWS=$(which aws)

	# Start original aws executable with short-lived keys
	AWS_ACCESS_KEY_ID=$(sed -En 's/^Access-Key: (.*)/\1/p' <<< "$PASS") \
	AWS_SECRET_ACCESS_KEY=$(sed -En 's/^Secret-Key: (.*)/\1/p' <<< "$PASS") $AWS $@
}

Then use the cli tool aws as usual:
$ aws iam list-access-keys
{ "AccessKeyMetadata": [ { "UserName": "stv0g", ...

Use Yubikey and Password-store for Ansible credentials

I spent some time over the last months to improve the security of servers and passwords. In doing so, I started to orchestrate my servers using a configuration management tool called Ansible. This allows me to spin-up fresh servers in a few seconds and to get rid of year-old, polluted and insecure system images.

ansible_loves_yubico

My ’single password for everything‘ has been replaced by a new password policy which enforces individual passwords for every single service. This was easier than I previously expected:

To unlock the ‚paranoid‘ level, I additionally purchased a Yubikey Neo token to handle the decryption of my login credentials in tamper-proof hardware.
pass‚ is just a small shell script to glue several existing Unix tools together: Bash, pwgen, Git, xclip & GnuPG (obeying the Unix philosophy). The passwords are stored in simple text files which are encrypted by PGP and stored in a directory structure which is managed in a Git repository.

IMG_20150526_121142
Yubikey Neo und Neo-n

There are already a tons of tutorials which present the tools I describes above. I do not want to repeat all that stuff. So, this post is dedicated to solve some smaller issues I encountered:

Use One-Time passwords across multiple servers

The Yubikey Neo can do much more than decrypting static passwords via GnuPG:

  • Generate passwords:
    • fixed string (insecure!)
    • with Yubico OTP algorithm
    • with OATH-HOTP algorithm
  • Do challenge response authentication
    • via FIDO’s U2F standard
    • with HMAC-SHA1 algorithm
    • with Yubico OTP algorithm

Some third-party services already support FIDO U2F standard or traditional OATH-{H,T}OTP TFA, like used by the Google authenticator app. I suggest to have a look at: https://twofactorauth.org/.

For private servers there are several PAM modules available to integrate OTP’s or Challenge Response (CR) methods. Unfortunately, support for CR is not widespread across different SSH- and mail clients.

So, you want to use OTP’s which leds to another problem: OTP’s rely on a synchronized counter between the hardware token and the server. Once you use multiple servers, those must be synchronized as well. I’m using a central Radius server to facilitate this.

Integrate ‚pass‘ into your Ansible workflow

Ansible uses SSH and Python scripts to manage several remote machines in parallel. You must use key-based SSH authentication, because you do not want to type every password manually! Additionally you need to get super user privileges for most of your administrative tasks on the remote machine.

The SSH authentication is handled by gpg-agents ‚–enable-ssh-support‘ option and a PGP key on your token.

To get super user privileges, I use the following variable declaration my Ansible „group_vars/all“ file:
---
ansible_sudo_pass: "{{ lookup('pipe', 'pass servers/' + inventory_hostname) }}"

There is a separate root password for every server (e.g. „pass servers/lian.0l.de“). I wrote some ansible roles to easily and periodically roll those passwords.

Integrate ‚pass‘ into OS X

There are already several plugins and extensions to intergrate the ‚pass‘ password store into other Programs like Firefox and Android.

pass_osx_prompt
A prompt for the password you want

I added support for OS X by writing a small AppleScript which can be found here: https://github.com/zx2c4/password-store/blob/master/contrib/pass.applescript

pass_osx_notification
A notification with countdown

Workshop: Security Token

Der Open Source Arbeitskreis (OSAK) der Fachschaft FSMPI, veranstaltet nun zum zweiten Mal eine Crypto Party auf der sich Interessierte über Verschlüsselung und verwandte Themen informieren können.

Ich möchte hier die Gelegenheit nutzen um etwas Werbung für diese Veranstaltung zu machen. Genaue Infos findet Ihr unten im Flyer.

Dieses Mal wird es auch einen kleinen Workshop von mir geben:

Hardware Crypto Tokens

„I know none of my passwords“

Ich werde in ca. 20 Min eine kurze Übersicht über Security Tokens wie bspw. den Yubikey oder die OpenPGP Smartcard geben. Dabei wird der Fokus auf verschiedenen Anwendungsszenarien wie bspw. One-Time-Passwords, Logins, E-Mail Verschlüsselung usw liegen.

Update: Hier sind die Vortragsfolien und das Handout:

Präsentation (pdf)
Handout (pdf)

cryptoparty-ss2015

Casting between Qt and OpenCV primitives

opencv_qtAs a follow-up to the previous post, I’d like to present some code which I think might be helpful for other Qt / OpenCV projects as well.

This code was written for Pastie. Pastie is a piece of software I wrote as part my image processing seminar. It makes use of the well known libraries:

  • Qt for the graphical user interface
  • OpenCV for image processing and computer vision

I wrote a C++ header file to facilitate the co-operation of those two libraries. This file enables the conversion / casting of OpenCV and Qt types e.g.:

#include <QImage>
#include <cv/core.hpp>

QImage qimg("filename.png");
cv::Mat cvimg = toCv(qimg);

The source code is available at GitHub.

The following conversions are supported:

QImage cv::Mat
QTransform cv::Mat
QPoint cv::Point2i
QPointF cv::Point2f
QRect cv::Rect2i
QRectF cv::Rect2f
QSize cv::Size

You can find some examples in the real code here and here.